In Appleton, Wisconsin, where climate variability demands attention, siding installation with a focus on moisture barriers is paramount for home protection. Vinyl siding, chosen for its durability and low maintenance, requires proper sealing to prevent water intrusion. A well-installed moisture barrier ensures condensation and rainwater runoff, safeguarding the siding and structural integrity of your home. This step-by-step guide covers surface preparation, flashing, underlayment, panel fastening, and final sealing for a seamless installation. Regular inspections and addressing early signs of moisture protect against wood rot, mold, and structural issues. Professional siding installation enhances curb appeal and ensures long-lasting, low-maintenance protection for your Wisconsin home.
- Understanding Siding Moisture Barriers: The Role in Appleton, Wisconsin Home Protection
- Vinyl Siding Installation: A Step-by-Step Guide for Effective Moisture Barrier Creation
- Common Moisture Issues with Siding and How to Prevent Them
- Choosing the Right Materials: Exploring Options for Optimal Moisture Barrier Performance
- Maintenance Tips: Ensuring Your Siding Moisture Barriers Last in Appleton's Climate
Understanding Siding Moisture Barriers: The Role in Appleton, Wisconsin Home Protection
In Appleton, Wisconsin, understanding siding moisture barriers is crucial for protecting your home from potential water damage. With the region’s unique climate and changing weather patterns, proper barrier systems are essential components during siding installation. The primary goal of these barriers is to prevent moisture penetration, which can lead to rotting wood, mold growth, and other structural issues over time.
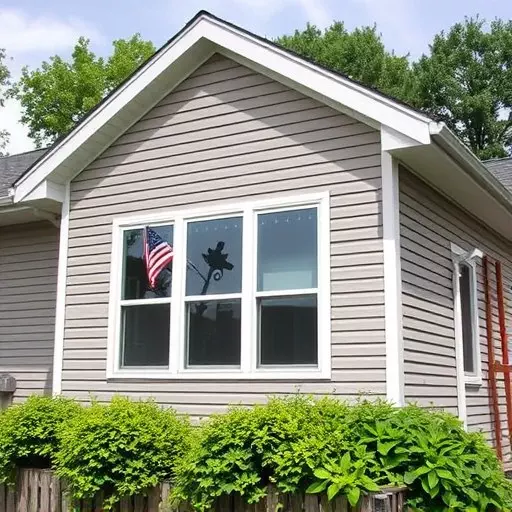
When it comes to siding installation Appleton Wisconsin residents often opt for vinyl siding due to its durability and low maintenance properties. Vinyl siding, when installed with a robust moisture barrier system, offers an effective defense against water intrusion. This is especially important as vinyl siding, if not properly sealed, can become porous and allow water to seep through. A well-installed moisture barrier ensures that any condensation or rainwater runs off the exterior of your home, maintaining the integrity of your siding and the overall health of your structure.
Vinyl Siding Installation: A Step-by-Step Guide for Effective Moisture Barrier Creation

When it comes to siding installation in Appleton, Wisconsin, creating an effective moisture barrier is paramount for protecting your home’s exterior and ensuring long-lasting durability. Vinyl siding, known for its low maintenance and attractive aesthetics, plays a crucial role in this process. Here’s a step-by-step guide for installing vinyl siding while establishing a robust moisture barrier:
1. Prepare the Surface: Start by thoroughly cleaning and preparing the surface where the vinyl siding will be installed. Remove any debris, old siding remnants, or loose material. Ensure the area is dry to prevent moisture intrusion during the installation process. This step lays the foundation for effective water shedding and prevents damaging condensate buildup.
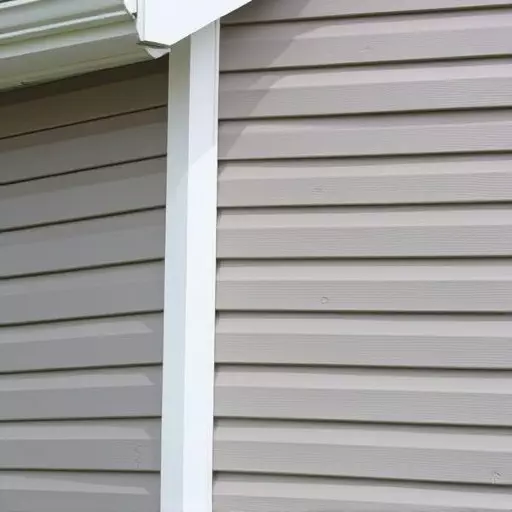
2. Flash and Seal Joints: For a robust moisture barrier, flashing is essential at joints, corners, and openings like doors and windows. Install flashings made from high-quality materials to seal these areas. Ensure proper overlap and sealing of adjacent panels using compatible caulk or sealant. This step prevents water penetration through seams, enhancing the overall protection against moisture.
3. Use Underlayment and Housewrap: Layer an appropriate underlayment over the sheathing, followed by a housewrap or moisture barrier film. These materials act as secondary defenses against moisture seepage. The underlayment provides added insulation while the housewrap creates a continuous barrier, keeping water out and preventing condensation on the interior walls.
4. Secure Siding Panels: Fasten vinyl siding panels using nails or screws designed for exterior applications. Follow manufacturer guidelines for recommended spacing between fasteners to ensure proper air movement behind the siding—a key factor in avoiding moisture-related issues like mold growth. Regularly inspect and maintain the siding, replacing any damaged or loose pieces promptly.
5. Final Sealing: After installing all panels, perform a final check for any gaps or openings. Seal these areas with caulk or an exterior-grade sealant to provide an extra layer of protection against moisture intrusion. This step ensures that your home’s exterior is fully protected against the elements and maintains its aesthetic appeal.
Common Moisture Issues with Siding and How to Prevent Them

Moisture issues are a common problem with exterior cladding, including siding. When moisture seeps behind vinyl siding in Appleton, Wisconsin, it can cause significant damage to the structure over time. This is why proper installation and regular maintenance are essential to prevent such problems. One of the primary ways to avoid these issues is by ensuring a seamless fit during the siding installation process. Gaps or cracks, even tiny ones, can allow water to enter, leading to wood rot, mold growth, and potential structural damage.
Regular inspections and quick repairs are key to maintaining your siding’s integrity. Keep an eye out for signs of moisture intrusion, such as peeling paint, warped siding, or noticeable water stains. If you’re considering vinyl siding installation, opt for high-quality materials and trusted local contractors who understand the region’s climate and specific challenges. This can significantly reduce the risk of moisture-related problems in the long run, ensuring your home stays protected and aesthetically pleasing.
Choosing the Right Materials: Exploring Options for Optimal Moisture Barrier Performance

Maintenance Tips: Ensuring Your Siding Moisture Barriers Last in Appleton's Climate
