
Installing a car audio system in a truck requires understanding its unique electrical architecture. DIY installations demand planning and knowledge of specialized wiring, while professionals use tailored kits. For Toledo, OH truck owners, choosing between DIY and professional services depends on cost, customization, and expertise needed for optimal sound quality. Proper grounding, high-quality wires, and strategic speaker mounting are crucial for successful installations. SEO keywords: car audio system installation for trucks toledo, diy truck audio installation, professional truck audio installation.
“Enhance your trucking experience with a powerful car audio system! This comprehensive guide delves into the world of truck audio system wiring, offering both DIY enthusiasts and professionals an in-depth look. From understanding basic wiring to choosing top-tier components, we cover it all. Learn about the pros and cons of DIY vs professional installation, master a step-by-step guide for a seamless fit, and avoid common mistakes. Whether you’re in a Toledo or beyond, this is your ultimate resource for transforming your truck into an audio symphony.”
- Understanding Truck Audio System Wiring Basics
- Choosing the Right Components for Your Truck
- DIY vs Professional Installation: Pros and Cons
- Step-by-Step Guide to Installing a Car Audio System in a Truck
- Common Mistakes to Avoid During Truck Audio System Wiring
Understanding Truck Audio System Wiring Basics
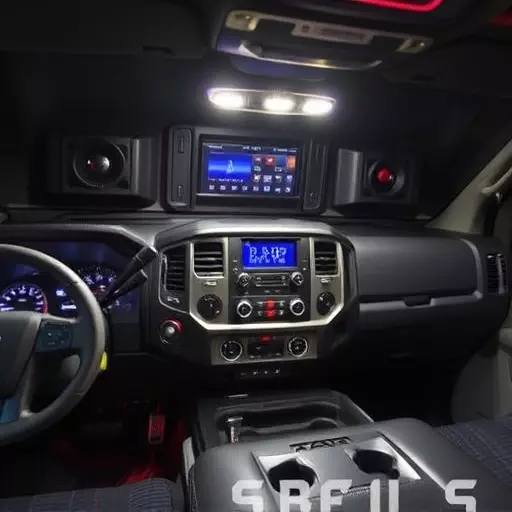

Understanding the basics of truck audio system wiring is essential when looking to install a new car audio system in your vehicle. Unlike passenger cars, trucks often come with unique electrical architectures due to their specialized nature and additional features like powerful lighting systems, tow packages, or heavy-duty engines. Therefore, a DIY truck audio installation might require more careful planning and specific knowledge compared to a standard car audio setup.
When considering a professional truck audio installation for your Toledo, the expert technicians will account for these variations, ensuring the new system seamlessly integrates with your truck’s electrical system. They’ll employ specialized wiring kits designed specifically for trucks, addressing any unique challenges posed by factors like cab layout differences, additional lighting circuits, and specific voltage requirements. This tailored approach guarantees optimal performance and a reliable audio experience for folks who need their truck to be as robust and capable off the road as it is on it.
Choosing the Right Components for Your Truck

When it comes to upgrading your truck’s audio system, selecting the right components is key. Consider factors like power requirements, compatibility with your vehicle, and desired sound quality. In a DIY truck audio installation for models like the Toledo, opt for amplifiers rated for high-power handling and speakers designed to deliver crisp sound in challenging vehicle environments.
For a professional truck audio installation, it’s essential to consult experts who understand the unique challenges of integrating car audio systems into trucks. They can recommend components optimized for performance and durability on the road, ensuring your investment translates into an enhanced driving experience with superior audio quality.
DIY vs Professional Installation: Pros and Cons

DIY vs Professional Installation
When it comes to installing a car audio system in your truck, there’s a significant debate between doing it yourself (DIY) and hiring a professional. DIY enthusiasts often find allure in the idea of customizing their vehicle themselves, saving on costs, and learning new skills. A well-planned DIY installation can result in a satisfying project, allowing you to choose exactly what components fit your needs and preferences. However, for those without prior experience or the necessary tools, attempting a truck audio system wiring setup yourself could lead to frustration, potential safety hazards, and suboptimal sound quality due to improper connections or incorrect component placement.
On the other hand, professional installation offers peace of mind, ensuring your car audio system is fitted correctly, securely, and safely. Professionals have the expertise and tools to navigate complex wiring diagrams, properly ground the system for optimal performance and safety, and fine-tune the setup for balanced sound output across all speakers. This option might come at a higher cost but guarantees a hassle-free experience. For those seeking top-notch audio performance, advanced features, or intricate custom installations in their Toledo, OH trucks, professional installation is often the preferred choice, ensuring long-lasting satisfaction and a seamless driving experience.
Step-by-Step Guide to Installing a Car Audio System in a Truck

Installing a car audio system in your truck can transform your driving experience, offering superior sound quality and entertainment on the road. Whether you’re opting for a DIY approach or seeking professional assistance, here’s a step-by-step guide tailored for truck owners in mind, focusing specifically on the Toledo market.
1. Plan Your Setup: Begin by assessing your truck’s interior and identifying the best locations for speakers and components. Consider factors like space constraints, existing wiring, and desired sound projection. Research compatible car audio systems designed for trucks to ensure a seamless fit. For Toledo residents, exploring local automotive stores or online platforms catering to this specific vehicle type can yield excellent results.
2. Prepare the Wiring: The next crucial step involves preparing your truck’s electrical system. Start by locating the battery and checking the existing wiring harness. You may need to run new wires for power, ground, and signal connections. Ensure proper grounding techniques are applied to prevent electrostatic interference. Professional installers often use specialized tools and connectors to guarantee a secure and reliable audio setup.
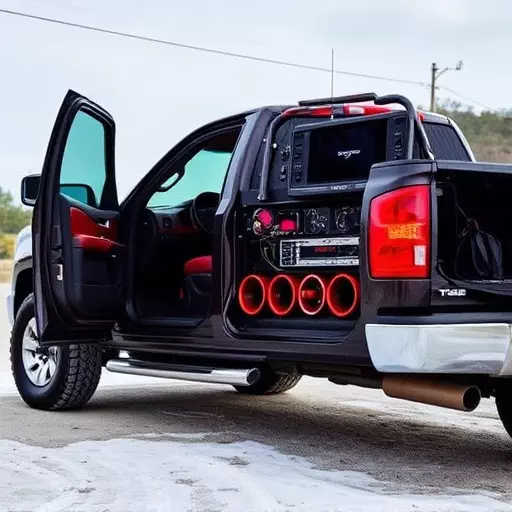
3. Mount Speakers Strategically: Securely mount your speakers according to the manufacturer’s instructions. This step requires precision to ensure optimal sound projection and avoid unwanted vibrations. Consider factors like speaker angle, distance from obstacles, and alignment for the best audio performance.
4. Connect Components: Integrate your chosen car audio system components, including the head unit, amplifier, subwoofer (if applicable), and any other accessories. Follow the manufacturer’s guidelines to establish proper connections for power, signal, and grounding. A well-organized and labeled wiring diagram can assist in this process, especially for DIY enthusiasts.
5. Test and Adjust: Once everything is connected, power on the system and conduct thorough testing. Check each component’s functionality, adjusting settings for optimal performance. Equalize the audio and fine-tune the bass and treble to match your preferences and vehicle acoustics.
Common Mistakes to Avoid During Truck Audio System Wiring

When tackling a car audio system installation for trucks—be it a DIY project or a professional setup—it’s vital to steer clear of certain pitfalls that can compromise the integrity and performance of your audio system. One common mistake is neglecting proper grounding, which ensures optimal signal transfer and prevents static. Always use dedicated ground wires and connect them securely to a clean, unpainted metal surface within the truck’s chassis. Another error is underestimating the importance of high-quality wiring and connectors. Low-grade components can introduce interference and result in crackling or distorted sound. Invest in durable, shielded wire and reliable connectors designed for automotive applications.