
Installing a swinging glass shower door in Lake Orion, Michigan involves gathering specific tools (measuring tape, level, drill, bits, caulk, etc.), measuring and marking the frame, removing old caulk, mounting fixed panels, installing hinges, sealing with caulk, testing for operation, and adjusting hinges. This process ensures a stylish and functional enhancement to your bathroom, achieved with the right toolkit for precise measurements and watertight seals. Key SEO keywords: swinging glass shower door installation lake Orion Michigan, swinging glass shower door installation steps, tools required for swinging shower door installation.
“Enhance your Lake Orion, Michigan bathroom with a sleek and modern swinging glass shower door. This article guides you through the process of installation, focusing on the crucial role of silicone as a sealant. From understanding the benefits of silicone for shower door seals to navigating the steps of a successful swinging glass shower door installation in Lake Orion, Michigan, discover why this material is a game-changer. Learn about the essential tools required and best practices to ensure a durable and attractive finish.”
- Understanding Silicone for Shower Door Seals
- The Swinging Glass Shower Door Installation Process in Lake Orion, Michigan
- Tools Required for a Successful Shower Door Installation
- Benefits and Best Practices for Using Silicone Sealant
Understanding Silicone for Shower Door Seals

The Swinging Glass Shower Door Installation Process in Lake Orion, Michigan

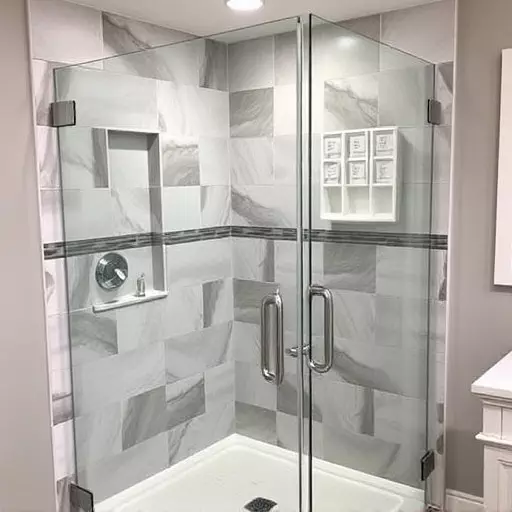
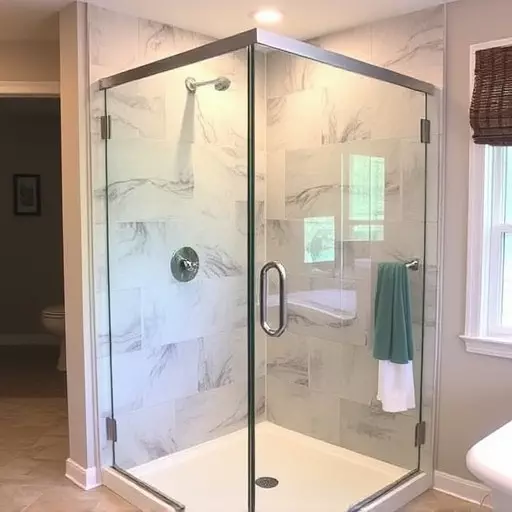
In Lake Orion, Michigan, the swinging glass shower door installation process involves several meticulous steps to ensure a seamless and secure fit. First, gather the necessary tools including measuring tape, level, pencil, drill with bits, silicone caulk, and a new swinging glass shower door. Begin by measuring and marking the existing shower frame to note any adjustments required for the new door. Next, remove any old caulk or debris from the frame using a wire brush or scraper.
Proceed with mounting the fixed panel of the shower door, securing it in place with screws. Once the fixed panel is firmly attached, it’s time to install the swinging door. Carefully align the door with the hinges and secure them using the appropriate hardware. Apply a bead of silicone caulk along the door’s sealing edge, ensuring it creates a watertight seal. Finally, test the door’s operation, adjusting hinges as needed to ensure smooth swinging and a proper fit.
Tools Required for a Successful Shower Door Installation

When it comes to installing a swinging glass shower door in Lake Orion, Michigan, having the right tools is key to a successful and seamless process. The basic toolkit for this project includes a variety of items that will ensure precise measurements and secure installations. Start with measuring tape to accurately gauge the space, ensuring you have the correct size door. A level is essential for ensuring the door is straight and true, avoiding any unevenness or misalignment.
For cutting and shaping, you’ll need a utility knife and a jig saw, both of which will help you create the perfect fit for your shower frame. Additionally, a silicone gun and caulk are must-haves for sealing the door, providing water resistance and a durable finish. Don’t forget safety gear like gloves to protect your hands during the installation process. With these tools ready, you’re well-prepared to tackle the swinging glass shower door installation steps with confidence.
Benefits and Best Practices for Using Silicone Sealant

Silicone sealant is a versatile and durable solution for sealing swinging glass shower doors, as seen in many homes across Lake Orion, Michigan. Its benefits are numerous; it provides an airtight seal, preventing water seepage that could lead to mold and mildew issues. Silicone’s flexibility allows it to accommodate the natural movement of the door, ensuring a long-lasting seal over time. This is especially important during the swinging glass shower door installation process, as it offers superior adhesion compared to other sealants.
When using silicone for your shower door project, follow these best practices. First, ensure proper preparation; clean the surfaces thoroughly and remove any debris or old sealant remnants. The tools required for this job include a putty knife, a caulk gun (optional but recommended), and protective gear. Apply the silicone in a thin, even layer, following the manufacturer’s instructions for curing time. For a seamless finish, consider practicing on scrap materials first to get a feel for the application technique, especially when dealing with tight spaces and intricate door designs, as is common in swinging glass shower door installations.