Installing a swinging glass shower door in Lake Orion, MI requires careful preparation and precise execution. Begin with accurate measurements using tools like a tape measure, level, and marker. Gather essential tools including an electric drill, safety gear, and the correct hinges (stainless steel or brass for durability). Remove the old door, clean the space, and ensure the floor is level. Follow these steps: mark hinge locations, drill pilot holes, install hinges, attach the swinging door, and adjust for leveling. Conduct final checks for security, alignment, and water tightness. Regular maintenance involves cleaning, lubrication, and periodic hinge inspection. Use specific tools like adjustable wrenches, screwdrivers, and silicone caulk for efficient troubleshooting.
Choosing the right hinges is pivotal for a successful swinging glass shower door installation in Lake Orion, Michigan. This comprehensive guide walks you through every step, from understanding the installation process to selecting the optimal hinges and performing the setup yourself. We’ll highlight essential tools needed for a seamless fit and provide maintenance tips. By following these steps, you’ll ensure your swinging glass shower door not only looks elegant but also functions flawlessly for years to come, enhancing your Lake Orion bathroom’s aesthetic appeal.
- Understanding Swinging Glass Shower Door Installation
- Essential Tools for Successful Installation
- Measuring and Preparing Your Shower Enclosure
- Selecting the Right Hinges for Optimal Performance
- Step-by-Step Guide to Installing Swinging Doors
- Tips for a Secure and Seamless Fit
- Final Checks and Maintenance Guidelines
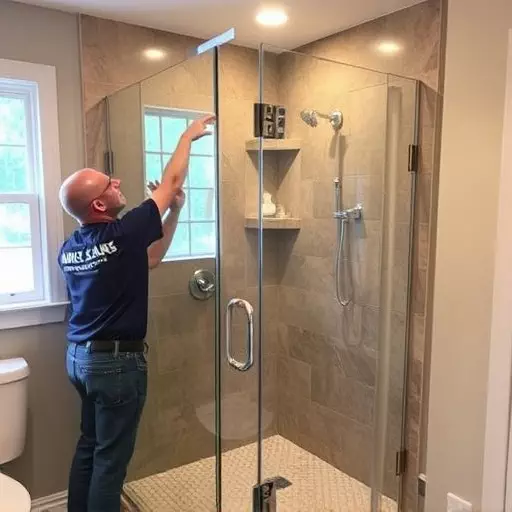
Understanding Swinging Glass Shower Door Installation


When it comes to installing a swinging glass shower door in Lake Orion, Michigan, understanding the process is key. This type of installation involves precise measuring and careful handling of components to ensure a secure fit. The first step is to assess your shower space, taking accurate measurements to determine the appropriate size of the door. You’ll need tools like a tape measure, level, and marker to make these measurements.
Once you have the dimensions, it’s time for the swinging glass shower door installation steps. This typically includes attaching the hinges to the door panel and then connecting them to the frame using specific hardware. The tools required for this job include a drill with the appropriate bits, screws, and spacers. Proper alignment is crucial to ensure smooth operation of the door; use your level to ensure everything is straight before securing the hinges and door in place.
Essential Tools for Successful Installation
When tackling a swinging glass shower door installation in Lake Orion, Michigan, having the right tools is half the battle won. For a successful and seamless process, you’ll need a few essential items to ensure precision and ease. The first on the list is a high-quality set of measuring tapes, as accuracy in sizing is crucial for a proper fit.
Additionally, a powerful electric drill with various bits will be indispensable, especially for drilling pilot holes and securing the hinges. Don’t forget protective gear like safety glasses and work gloves to safeguard yourself during the installation process. Knowing the tools required beforehand, as outlined in these swinging glass shower door installation steps, will make the task more manageable and efficient.
Measuring and Preparing Your Shower Enclosure
Before installing a swinging glass shower door, accurately measuring your shower enclosure is crucial. This involves taking precise dimensions of both the opening and the surrounding areas to ensure the door fits perfectly. Start by measuring the width and height of the shower space, noting any unique features or obstructions like shelves or corner shapes. Additionally, measure the thickness of the glass you plan to use to account for proper clearance.
Preparing your shower enclosure includes cleaning the area thoroughly to eliminate any dirt, debris, or old sealants that could hinder installation. Remove any existing hardware or fixtures that might interfere with the new door’s swing path. Ensure the floor around the shower is level and secure, as this stability is essential for a smooth and safe swinging glass shower door installation in Lake Orion, Michigan. The tools required for this process typically include measuring tape, a level, a pencil, safety goggles, and gloves.
Selecting the Right Hinges for Optimal Performance

Choosing the right hinges is a critical step in any swinging glass shower door installation, especially in Lake Orion, Michigan, where weather conditions can vary. The optimal hinges should be designed to handle both heavy doors and the region’s environmental factors. Look for models with robust construction, typically made from durable materials like stainless steel or brass, which offer superior resistance to corrosion and rust, ensuring long-term performance.
When installing a swinging glass shower door, understanding the necessary tools is key. Basic tools required include a level, measuring tape, a drill, screwdriver, hacksaw (for cutting the frame if needed), and protection gear like safety glasses. Advanced tools such as a hinge installer or a hammer can also aid in ensuring precise and efficient installation, aligning with the specific demands of Lake Orion’s shower door installation steps.
Step-by-Step Guide to Installing Swinging Doors

Step-by-Step Guide to Installing Swinging Doors
Installing a swinging glass shower door is a relatively straightforward process, but it requires careful measurement and the right tools for a secure fit. Begin by removing the old door frame and any hardware. Take precise measurements of the opening, ensuring you have the correct dimensions for the new swinging door. Gather your tools: a measuring tape, level, pencil, drill, screwdriver, and a set of hinges suitable for your door size and weight.
Next, mark the hinge locations on the door frame using your measurements. Drill pilot holes for the screws, being mindful not to damage the glass surface. Install the hinges by securing them firmly in place with the provided hardware. Once the hinges are fitted, attach the swinging door, ensuring it hangs level. Adjust the hinges as needed until a smooth swing is achieved.
Tips for a Secure and Seamless Fit

When installing a swinging glass shower door in Lake Orion, Michigan, ensuring a secure and seamless fit is paramount to prevent water leaks and maintain aesthetics. Here are some essential tips for achieving a perfect installation:
1. Measure Twice, Cut Once: Accurate measurements are crucial. Double-check the dimensions of your shower opening before purchasing hinges or cutting any materials. This step ensures that your door will swing correctly and fit snugly without any adjustments needed after installation.
2. Use the Right Tools: Gather the necessary tools for a successful swinging glass shower door installation, including a level, tape measure, marker, drill, screwdriver, and any hardware provided with your hinges or door kit. Using the correct tools guarantees precision and prevents damage to the door or frame during the installation process.
3. Hinge Placement: Proper hinge placement is key to a secure fit. Follow manufacturer instructions regarding hinge positioning and spacing. Typically, hinges should be placed at the top and bottom of the shower door, ensuring even weight distribution and smooth swinging motion.
4. Leveling the Door: After installing the hinges, level the door carefully using a level tool. Adjust the hinges if needed to ensure the door hangs straight and true. A level door guarantees that water will flow smoothly down the glass without seeping in at the edges.
Final Checks and Maintenance Guidelines

Before finalizing the swinging glass shower door installation Lake Orion Michigan, conduct thorough checks to ensure all components are secure and aligned correctly. Inspect hinges for any signs of damage or misalignment, tightening any loose screws or pins. Verify that the door swings smoothly in both directions, adjusting the hinges if necessary to maintain even balance. Test the door’s seal to guarantee water tightness, ensuring no gaps or leaks occur at the perimeter.
Regular maintenance is crucial for prolonged hinge longevity. Clean hinges periodically with a soft cloth and mild soap solution to remove buildup and debris. Lubricate moving parts with a silicone-based lubricant to minimize friction and wear. Periodically inspect hinges for excessive wear or damage, replacing them if necessary to maintain door functionality and safety. Understanding the swinging glass shower door installation steps and the tools required—such as adjustable wrenches, screwdrivers, and silicone caulk—will facilitate efficient troubleshooting and maintenance going forward.