
“Enhance your car audio experience with a focus on safety: exploring the art of amplifier fuse installation. This comprehensive guide delves into the essential role of fuses in protecting your high-end sound system. We break down different types suitable for various car audio setups and navigate the debate between DIY and professional installation.
For those inclined to do it themselves, we offer a detailed step-by-step process. Additionally, learn from common mistakes to ensure a seamless experience. Whether you’re in Toledo or beyond, understanding amplifier fuse installation is crucial for any car audio enthusiast, offering both peace of mind and optimal performance.”
- Understanding Amplifier Fuses: Their Role and Types for Car Audio Systems
- DIY vs Professional Installation: Weighing the Pros and Cons
- Step-by-Step Guide to Installing an Amplifier Fuse in Your Vehicle
- Common Mistakes to Avoid During and After Amplifier Fuse Installation
Understanding Amplifier Fuses: Their Role and Types for Car Audio Systems

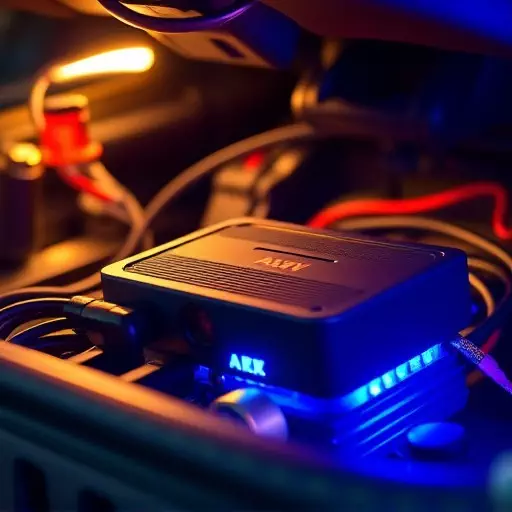
Amplifier fuses are an essential component in any car audio system, playing a critical role in protecting both the electrical components and the user from potential damage. They act as safety devices that interrupt the electrical flow if there’s an abnormal current, preventing overheating and short circuits. In the context of car amplifier installation Toledo or diy amplifier installation, understanding fuse types is key to ensuring the system functions optimally and safely.

There are several types of fuses available, each with a specific rating for amperage and voltage. For car audio systems, it’s crucial to choose fuses that match the power requirements of your amplifier(s). Professional amplifier installation services often recommend using high-quality fusible links or blade fuses that provide reliable protection while ensuring smooth operation during music playback.
DIY vs Professional Installation: Weighing the Pros and Cons

When it comes to installing an amplifier in your car, there are two main options: doing it yourself (DIY) or hiring a professional. DIY installation has become increasingly popular among car enthusiasts who want to save money and gain a sense of accomplishment. It involves purchasing the necessary components, following online tutorials, and putting together the system yourself. This method offers flexibility, cost-effectiveness, and the chance to learn about your vehicle’s electrical system. However, it requires careful planning, precision, and a basic understanding of car electronics, as incorrect installation could lead to damage or safety hazards.
On the other hand, professional amplifier installation is ideal for those who prioritize quality and peace of mind. Experts in this field have the expertise and tools to ensure a flawless setup, aligning components precisely and adhering to safety standards. They can also provide valuable advice on system optimization and integration with your vehicle’s existing electrical architecture. While it may come at a higher cost, professional installation is recommended for complex setups or those who lack confidence in their DIY skills, ensuring optimal performance and longevity of the amplifier. For car owners in Toledo seeking to enhance their audio experience, considering these pros and cons is crucial before deciding between DIY or professional amplifier installation.
Step-by-Step Guide to Installing an Amplifier Fuse in Your Vehicle

Installing an amplifier fuse is a crucial step in any car amplifier setup, whether you’re a DIY enthusiast or considering professional amplifier installation in Toledo. Here’s a straightforward guide to help you through the process:
1. Safety First: Before starting, ensure your vehicle’s engine is off and all electrical components are disconnected. Put on safety gear, including gloves, as a precaution. Locate the fuse box, often found under the steering wheel or behind a panel near the dashboard. Identify the specific fuse for your amplifier, usually labeled with ‘AMP’ or ‘SUB’.
2. Remove the Old Fuse: Open the fuse box and locate the appropriate slot for your amplifier fuse. Carefully remove the old fuse by pulling it straight out. Compare the new fuse to ensure it matches the amperage rating required by your amplifier. Insert the new fuse, ensuring it fits securely in the designated slot. Double-check that it’s properly seated before closing the fuse box.
Common Mistakes to Avoid During and After Amplifier Fuse Installation
