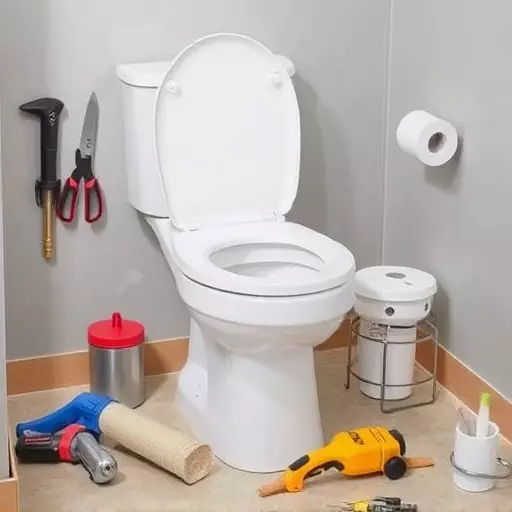
Securing the correct Toilet Installation Tools Toledo is crucial for a successful DIY toilet installation. This includes pliers for seals, a putty knife, screwdrivers, and sometimes cleaning solutions. Assembly begins with preparing your tools, measuring the toilet, and clearing the area. Follow manufacturer instructions for assembly, ensuring proper alignment using a level. Test water connections and tighten fittings. Correctly installing non-wax toilet seals is a simple DIY project requiring specific tools. Mistakes like using incorrect tools or skipping preparation can lead to issues. Test and adjust the seal before proceeding. Clean thoroughly after installation and maintain regularly for longevity.
Looking to upgrade your bathroom with a non-wax toilet seal? This comprehensive guide is your go-to resource. We’ll walk you through every step of the Toilet Installation Process, from understanding the Toilet Installation Tools Toledo to final touches and maintenance tips. Whether you’re a professional or tackling it as a DIY Toilet Installation, our detailed sections ensure a smooth, secure, and stress-free process.
- Understanding the Toilet Installation Tools Toledo
- Preparations for DIY Toilet Installation
- Unboxing and Assembling Your New Toilet
- The Step-by-Step Toilet Installation Process
- Common Mistakes to Avoid During Installation
- Testing and Adjusting Your New Seal
- Final Touches and Maintenance Tips
Understanding the Toilet Installation Tools Toledo

When it comes to installing a non-wax toilet seal, having the right Toilet Installation Tools Toledo is essential for a smooth and successful DIY Toilet Installation process. The typical tools required include a set of pliers, a screwdriver (both flathead and Phillips), a putty knife, and a new toilet seal or wax-free adhesive. These tools are necessary to dislodge the old seal, clean the surface, and apply the new sealing material properly.

Understanding how each tool is used during the Toilet Installation Process is crucial. For instance, pliers help in removing the existing seal, while a putty knife facilitates the application of the adhesive or sealant. A screwdriver is handy for securing any components that need to be fastened. Familiarity with these tools and their functions allows for a more efficient and effective DIY toilet installation project.
Preparations for DIY Toilet Installation

Before tackling a DIY toilet installation, ensure you have all the necessary tools at hand—a set of pliers, a level, a measuring tape, and an adjustable wrench are essentials for the Toledo toilet installation process. Clear the area around the toilet, removing any old sealing products or debris to create a clean canvas for your new non-wax seal. Proper preparation is key; measure the toilet’s dimensions accurately to choose the right fit for your DIY project. This step-by-step approach ensures a smooth and successful toilet installation process.
Unboxing and Assembling Your New Toilet

Unboxing your new toilet is an exciting step in any DIY toilet installation project. Before assembly, lay out all components and tools required for the Toledo toilet installation process. This typically includes the toilet, mounting hardware, supply lines, and a variety of tools like wrenches, pliers, and a level. Following manufacturer instructions, carefully assemble the toilet, ensuring all parts are securely fitted together.
Proper alignment is crucial for a seamless DIY toilet installation. Use your level to ensure the toilet is plumb, and adjust the mounting hardware as needed. Once assembled, test the water connections, tightening any loose fittings with the appropriate tools. This step-by-step approach will prepare you to successfully install your new toilet and achieve a professional-looking bathroom renovation without requiring special expertise or costly professionals.
The Step-by-Step Toilet Installation Process

Non-Wax toilet seal installation is a straightforward process that many homeowners can tackle as a DIY project. The first step involves gathering all necessary Toilet Installation Tools Toledo, including an adjustable wrench, a screwdriver, and the new non-wax seal. Turn off the water supply to the toilet, then remove the old seal by unscrewing any holding bolts and lifting it out carefully. Next, clean the area thoroughly to ensure no residue remains from the previous seal.
With the space prepared, insert the new non-wax seal into place, making sure all parts fit snugly. Secure it with the appropriate bolts or clips provided. Finally, turn on the water supply and test the seal for any leaks. This simple Toilet Installation Process can significantly enhance your bathroom’s hygiene and save you from costly professional installation fees.
Common Mistakes to Avoid During Installation

When tackling a DIY toilet installation, especially when it comes to non-wax seals, there are several common mistakes that homeowners often make. One of the most frequent errors is attempting the installation without the right tools. Using incorrect or inappropriate tools can lead to damage and an improper fit, so investing in quality Toilet Installation Tools Toledo is essential. From wrenches to sealers, having the right equipment ensures a smooth process.
Another mistake to steer clear of is skipping crucial preparation steps. The toilet installation process requires careful planning. This includes ensuring the floor is level, checking for any leaks, and properly preparing the existing plumbing connections. Rushing or overlooking these aspects can result in future issues, from water damage to poor drainage, so take your time and follow DIY Toilet Installation guides meticulously.
Testing and Adjusting Your New Seal

After installing your new non-wax toilet seal, it’s crucial to test and adjust for any leaks or misalignments before moving on to other aspects of your DIY toilet installation. Start by filling the toilet with water up to the rim; check if there are any signs of water seeping around the edges. If there are, carefully inspect the seal for any loose connections or improper placements. Adjust as needed using the appropriate Toilet Installation Tools Toledo for a secure fit.
The Toilet Installation Process doesn’t end at sealing. Ensure that the seal is level and properly aligned with the toilet bowl to prevent water from running down the sides. A poorly installed seal can lead to constant flushing issues and potential damage to your bathroom fixtures, so take your time to fine-tune it until it’s perfect. This step will not only ensure a leak-free experience but also highlight your DIY prowess in any toilet installation project.
Final Touches and Maintenance Tips

After successfully installing your new non-wax toilet seal, it’s time to add the final touches and ensure your DIY toilet installation is complete. This involves a thorough cleaning of the bathroom area to remove any debris or residue left over from the process. Use appropriate cleaning products and tools, such as Toilet Installation Tools Toledo, to achieve a spotless finish.
Regular maintenance is key to keeping your new toilet seal in top condition. Follow these simple tips: regularly check for any signs of damage or wear; keep the seal dry to prevent mold or mildew; and, if necessary, reapply sealing products as recommended by the manufacturer. These steps will not only prolong the life of your non-wax toilet seal but also maintain its functionality and aesthetic appeal, ensuring a smooth DIY Toilet Installation Process.